Check that your Ricoh copier can send scans by email: send a scan to one of our free test addresses and see it online in a minute or two. This guide gives the settings for Ricoh IM and MP models (also sold as Savin and Lanier), on the control panel and in Web Image Monitor, the copier's own web page.
Our fax numbers are also email addresses. Use one of our fax numbers, digits only, followed by @faxbeep.com.
Email Test Addresses
Or send a scan or an internet fax by email to one of these addresses
One TIFF, PDF or JPEG file, up to 20 pages. No PDF passwords.
Privacy note: Your scan becomes publicly visible for 30 days. We show only a masked form of your email address, and we never show the subject or the message text. We remove hidden data from image files, such as the device serial number. Do not send real documents.
How to test scan to email on your Ricoh
Follow these four steps to check that your Ricoh can send scans by email.
1. Copy a test address
Use one of our fax numbers, digits only, followed by @faxbeep.com.
2. Send from your Ricoh
Press Scanner, then Scan to Email, type the address, and scan 2 or 3 pages as one PDF.
3. See the result
Your scan appears on our home page in a minute or two, marked "Received by email".
4. Check the quality
Look at the orientation, the clarity and the page count.
Before you send: check these settings
Fix this first: your Ricoh IM splits scans into several emails. From the factory, Maximum Email Size is on at 2048 KB (2 MB), and Divide & Send Email is Yes (per Page). A scan above 2 MB goes out as several emails, and each email arrives here as a separate test with only part of the scan.
To fix it, go to Settings > Scanner Settings > Sending Settings > Email (Size). Raise Maximum Email Size to 7168 KB, or turn it off. Set Divide & Send Email to Off.
Then scan 2 or 3 pages, not one. With 3 pages, you can see at once if the copier sends one file for each page. Use PDF at 200 dpi, in black and white or color.
| Setting | Where on the Ricoh | Set it to |
|---|---|---|
| File type | Scanner > Send Settings > File Type |
PDF (Multi-page) |
| One file for all pages | The same File Type setting. PDF (Single Page) and TIFF / JPEG (Single Page) make one file for each page. |
PDF (Multi-page) |
| Email size and split | Settings > Scanner Settings > Sending Settings > Email (Size): Maximum Email Size and Divide & Send Email |
7168 KB or Off, and Off |
| Send as link | [Scanner Settings] > [Sending Settings] > [Email (URL Link)] > [File Emailing Method] |
Attach to Email |
| PDF password | The PDF options of File Type |
Off |
Watch for Auto Detect. With [File Emailing Method] set to Auto Detect, the copier sends a small scan as an attachment and a large scan as a link. A link email gets "No attachment found." So a 1-page test can pass while a real 10-page scan fails. Set Attach to Email.
On older MP models, the size setting is Max. E-mail Size, also on at 2048 KB from the factory. A multi-page PDF is not divided on these models, so raise Max. E-mail Size or turn it off.
Send the test from the control panel
You do not need to add our address to the address book. Type it in.
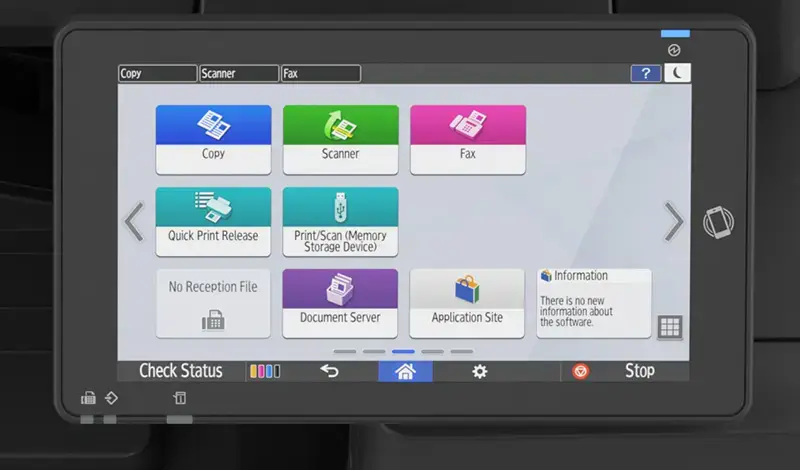
- On the Home screen, press
Scanner, thenScan to Email. - Press the destination (+) key, then
Enter Using Keyboard. - Type the test address and confirm.
- Check that
File TypeisPDF (Multi-page). - Put 2 or 3 pages in the feeder and start the scan.
The copier needs a sender for each email. If it asks for one, choose a sender, or ask the administrator to turn on Auto Specify Sender Name.
Set up the outgoing mail server (SMTP)
The copier sends the scan through your mail server. Open Web Image Monitor: type the copier's IP address in a web browser. The factory login is admin, with a blank password.
- Go to Device Management > Configuration > Email.
- Enter
SMTP Server NameandSMTP Port No.. The port is the number of the connection on the mail server. Microsoft 365 and Gmail use 587. - Set
Use Secure Connection (SSL)if your mail server needs an encrypted connection (TLS). - Turn on
SMTP Authenticationand enter the login. - Fill in
Administrator's Email Address. - Save, then send a test scan to one of our addresses.
For Gmail, use smtp.gmail.com, port 587, and an app password. An app password is a separate password that Google makes for one device, when 2-Step Verification is on.
Testing a client's copier from far away? You cannot press Scan from your desk, but you can see the result from anywhere. Ask someone at the copier to scan 2 or 3 pages to the test address, then watch our home page. You see the scan, the page count and the masked sender, without a call back.
What you can send
TIFF, PDF or JPEG. One file, up to 20 pages and about 5 MB. No PDF passwords.
| Item | Limit |
|---|---|
| File types | TIFF, PDF and JPEG |
| PDF passwords | Not accepted. Send the PDF without a password. |
| Files in one mail | One. If you send more, we show only one of them. |
| Pages | Up to 20 |
| Size | About 5 MB of file. The full email can be up to 7 MB. |
| Color | Accepted. We show your scan in color. |
| Tests | Up to 60 each hour from one email address |
If your printer makes one JPEG file for each page, set the file format to PDF or TIFF. Then all pages arrive in one file.
What the result tells you
This test checks two things: that your machine can send email, and how the scan looks when it arrives. It does not test a phone line.
| What you see | What it means |
|---|---|
| Your scan appears on Faxbeep | Your machine can send email. If your real recipient gets nothing, the problem is on their side: a spam filter, a size limit or a wrong address. |
| Your machine shows or prints one of our messages | Your email reached us, so your machine can send email. Change the file as the message says. See the list below. |
| The fax page says "This fax could not be processed" | Your email reached us, but we could not show the file. Send it again with a lower resolution or in a different file format. |
| Your machine shows a send error of its own | The email did not leave your machine. Check the outgoing mail server (SMTP) settings: server name, port, login and encryption. |
| Nothing appears, and you get no error | Check the address first. We do not answer email to a number that is not one of ours. Then wait a few minutes and send again. |
What each result means on a Ricoh:
| What you see | Likely cause on your Ricoh |
|---|---|
| You sent 3 pages and see 1 | File Type is PDF (Single Page) or TIFF / JPEG (Single Page). Set PDF (Multi-page). |
| You see 2 or more separate results for one scan | Divide & Send Email split the scan at Maximum Email Size, 2 MB from the factory. |
| "No attachment found." | [File Emailing Method] is Send URL Link, or Auto Detect sent a large scan as a link. Or Divide & Send Email is Yes (per Max. Size), which cuts the file into parts. |
For other printers and copiers, see the scan to email test.
Messages we send back
We do not send a reply email. If we cannot accept your scan, we refuse the email with a short message. Your mail server reports the message, and many printers show or print it.
| Message | Cause | What to do |
|---|---|---|
| File type not accepted. Send TIFF, PDF or JPEG. | The file is not a TIFF, PDF or JPEG. | Set the scan file format to PDF, TIFF or JPEG. |
| The PDF has a password. Send it without a password. | The PDF is encrypted. | Turn off PDF encryption or the PDF password in the scan settings. |
| No attachment found. | The email has no file, or the file is empty. | Check that your machine attaches the scan and does not send a link. |
| The file could not be read. Send it again. | The file is damaged, or it took too long to open. | Send it again. If it fails again, use a different file format. |
| File too large. See faxbeep.com for the limits. | More than 7 MB, more than 20 pages, or a very large image. | Use a lower resolution, scan fewer pages, or scan in black and white. |
| Too many tests. Try again later. | More than 60 tests in one hour from one address. | Wait one hour. |
Ricoh error messages
These messages come from the copier, not from us. They mean that the email did not leave your machine.
| Message on the copier | Cause | What to do |
|---|---|---|
| "Authentication with the destination has failed. Check settings." | Wrong SMTP user name or password | Enter the login again. For Gmail, use an app password. |
| "Exceeded max. email size. Sending email has been cancelled." | One page is bigger than the maximum email size | Raise Maximum Email Size, or scan at 200 dpi in black and white. |
| "Transmission has failed." | A network error | Check the network connection, the server name and the port. |
| "SMTP authentication email address and administrator email address mismatch." | The sender is not the signed-in address | Set Administrator's Email Address to the address that signs in. |
After the Microsoft 365 change
Microsoft plans to turn off password sign-in for sending mail from devices (SMTP AUTH with basic authentication) by default for existing Microsoft 365 tenants at the end of December 2026. A machine that sends through smtp.office365.com with a user name and password can stop sending on that date. Change it to the Microsoft sign-in (OAuth), or to a relay, then send a test to one of our addresses.
OAuth is the Microsoft sign-in, which gives the copier a token in place of a stored password. Ricoh added it to IM models in firmware from July 2025. In Web Image Monitor, go to Device Management > Configuration > Email, and under OAuth 2.0 Authentication press Start Authentication. The sender must be the account that signs in. Ricoh says: "If the email sender and the verified email address do not match, email sending will fail." So set Administrator's Email Address to the same account, and turn on Auto Specify Sender Name. TLS 1.2 must be on.
FAQ: Ricoh Scan to Email Test
Is the scan to email test free?
Yes. The test is free and you do not need to sign up.
Can other people see my scan?
Yes. Your scan becomes publicly visible for 30 days. If you need it removed sooner, click "Request removal" on its detail page. Do not send real documents.
I sent three pages but I see only one. Why?
Your copier probably sent one file for each page. We show one file for each email. Set File Type to PDF (Multi-page), so that all pages are in one file.
I see two results for one scan. Why?
The copier split the scan into more than one email, and each email is a separate test. On a Ricoh IM, Divide & Send Email is Yes (per Page) from the factory, with Maximum Email Size at 2 MB. Set Divide & Send Email to Off, and raise Maximum Email Size to 7168 KB or turn it off.
Can I test Ricoh scan to email remotely?
Someone must press Scan at the copier, but you can see the result from anywhere. Ask them to send 2 or 3 pages to one of our test addresses, then look at our home page. If the scan appears, the copier can send email.
Why is my scan-to-email not going through?
If the copier shows an error, the email did not leave it: check the login, the server name and the port. If there is no error and your recipient gets nothing, send a scan to one of our test addresses. If it appears here, the problem is on the side of the recipient: a spam filter, a size limit or a wrong address.
How do I set up Ricoh 365 scan-to-email?
Use smtp.office365.com, port 587, with the secure connection on. Update the firmware, then use OAuth 2.0 Authentication in Web Image Monitor under Device Management > Configuration > Email. The sender address must be the account that signs in.
Can I test Internet Fax (I-Fax) on my Ricoh too?
Yes. The same addresses accept internet faxes. See the internet fax test.